Monday, April 29, 2013

cget001-How to use Vector map in 3ds Max 2014

The new Vector Map introduced in 3ds Max 2014 gives you ability to use vector maps as texture maps and then render them with dynamic resolutions (independent of the display resolution). The rendered graphics will remain crisp and clear at any resolution. This vector map supports AutoCAD PAT Hatch, AI (Adobe Illustrator), SVG, PDF, and SVGZ formats. You can also animate the textures using a PDF file that contains animated page transitions. In this tutorial, you will use the ai format with the format with the Vector Map.


Step – 1

Navigate to the link http://www.mediafire.com/?k5288w91eeo16 and download the zipped file. Next, extract vectorMap folder to your hard drive.


Step – 2

Start 3ds Max 2014. Create a box in the viewport. In the Modify panel, set the Length, Width, and Height spinners to 100.


Step – 3

Apply an UVW Map modifier to the box. Select Box radio button from the Mapping area of the Parameters rollout.


Step – 4

Open the Compact Material Editor. Make sure the first sample slot is selected in it and then in the Blinn Basic Parameters rollout choose the button located next to the Diffuse color swatch; the Material/Map Browser will be displayed. Expand the Maps > Standard rollout if already not expended.


Step – 5

In the Standard rollout, select Vector Map and then choose the OK button; the Vector Map is displayed in the selected sample slot.


Step – 6

In the Parameters rollout, choose the button labeled as None corresponding to the Vector File parameter; the Select Vector Image File dialog box will be displayed. Next, select honey_bee.ai that you have downloaded at the beginning of the tutorial and then choose the Open button to close the dialog box.


Step – 7

In the Alpha Source area, select the Image Alpha radio button.

The Alpha Source area has three radio buttons: Image Alpha, RGB Intensity, and None (Opaque). On selecting the Image Alpha radio button, the alpha channel embed in the image is used a source of alpha. This radio button is disabled if image has no alpha channel. When you select the RGB Intensity radio button, the colors are converted to grayscale tonal values and then they are used for transparency. If you do not want to use the transparency, select the None (Opaque) option.


Step – 8

Apply material to the box and then choose the Render Production tool to render the scene. Figure tu1-1 shows the rendered output.
fig01
tu1-1  The rendered output

Step – 9

Now, zoom into the view and render again. You will notice that the honey bee image is still crisp and clear, refer to Figure tu1-2.
fig02
tu1-2  The render output of the zoomed view

Step – 10

Save the scene.

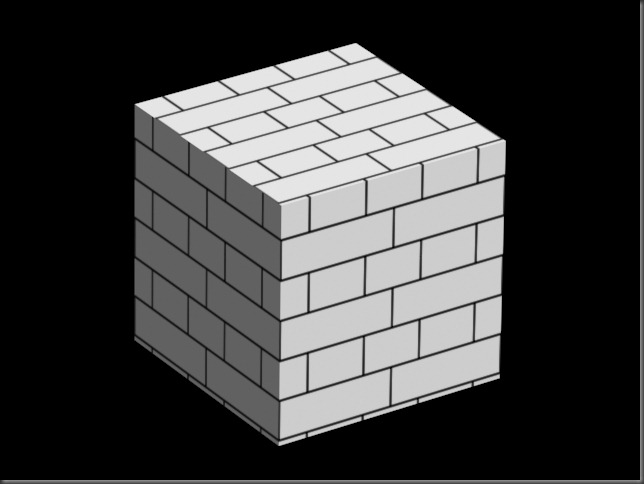
Now, you can try with various formats that the Vector Map supports. Figures tu1-3 and tut1-4 show the output using the SVG and AutoCAD PAT formats.
fig03
tu1-3  The output using the SVG format
fig04
tu1-4 The output using the AutoCAD PAT format

Saturday, April 27, 2013

cgetip007-Copying material to a library

In 3ds Max 2014, you can copy a material or map to newly created library with ease. To do so, right-click on the entry in the Material/Map Browser window; a shortcut menu will be displayed, refer to Figure tp7-1. Next, hover the cursor on the Copy to option; a cascading menu will be displayed. Choose the required material library from the cascading menu or choose the New Material Library option to copy the material to a new library.

fig13
tp7-1  The shortcut menu displayed

cgetip006-Check errors in the mesh using Mesh Inspector

The Mesh Inspector is used to check errors in texture channel or topology of editable mesh and poly objects. It come into action when you open/save a scene or you change topology of the geometry. The Mesh Inspector works in two levels. It first check the level 1 errors and repair them. These repairs are performed silently. Next, it checks for the level 2 errors and if the Mesh Auto Repair option is not selected in the Customize menu, refer to Figure tp6-1, the Mesh Inspector dialog box will be displayed with options to repair or skip the files. If the Mesh Auto Repair option is selected in the Customize menu, the level 2 errors are repaired silently as well.
fig12
tp6-1  The Customize menu
Below is the listing of level 1 and level 2 errors:

Level 1:
  • Unallocated texture map, texture face map, and texture vertex map channels
  • Not enough texture map faces allocated
  • Out-of-bound array indices in a texture map channel
  • Face degree mismatch in a texture map channel (only for poly meshes)
Level 2:
  • Invalid vertex values
  • References to invalid structure
  • Degenerate faces, spur edges, and no degree faces (only for poly meshes)
Tip: If you close the Mesh Inspector dialog box by choosing the (x) close button, the error correction for the current object will be skipped. If any other object in the scene has errors, this dialog box will reappear.

cgetip005-Selection brackets

I am not a big fan of the selection brackets. Selection brackets are off in 3ds Max 2014 by default. However, you can change this settings from the Viewport Configuration dialog box, refer to Figure tp5-1. To do so, in the Visual Style & Appearance tab of the dialog box, select the Selection Brackets check box of the Selection area. In this area, the Display Selected with Edged Faces check box is selected by default. As a result, the selected objects in the shaded viewports are displayed with the edged faces.

tp5-1 The Visual Style and Appearance tab

cgetip004-Enhanced Menus in 3ds Max 2014

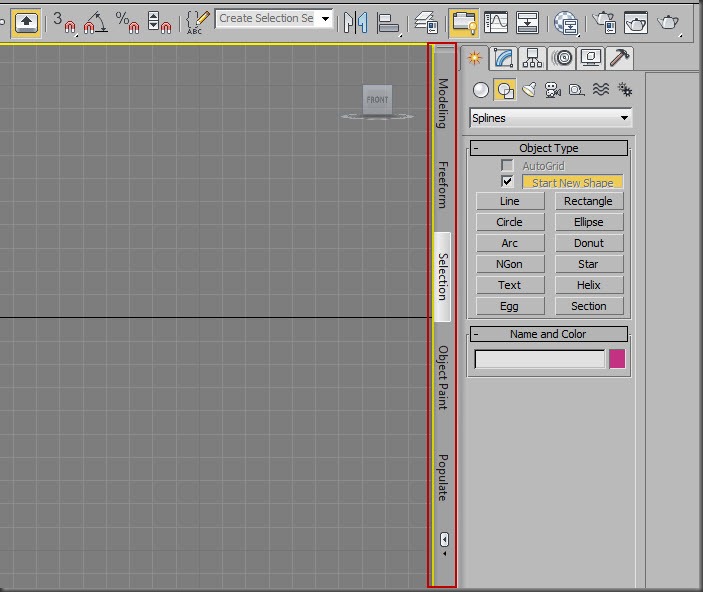
A new workspace, Default with Enhanced Menus, has been added in 3ds Max 2014. You can access this option from the Workspaces drop-down list, refer to Figure tp4-1. All other workspaces available in the Workspaces drop-down list use the default standard menu system and ribbon. When you activate the Default with Enhanced Menus workspace, 3ds Max orients ribbon vertically and to the left of the Command Panel, refer to Figure tp4-2.
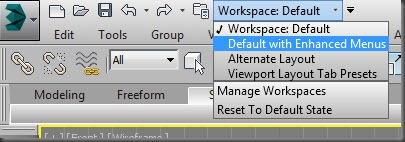
Figure4a
tp4-1 The Workspace drop-down list
Figure5
tp4-2  The vertically aligned ribbon
Additionally, you would be able to access the advanced menu system, refer to Figure tp4-3. You can improve your workflow using this menu system.
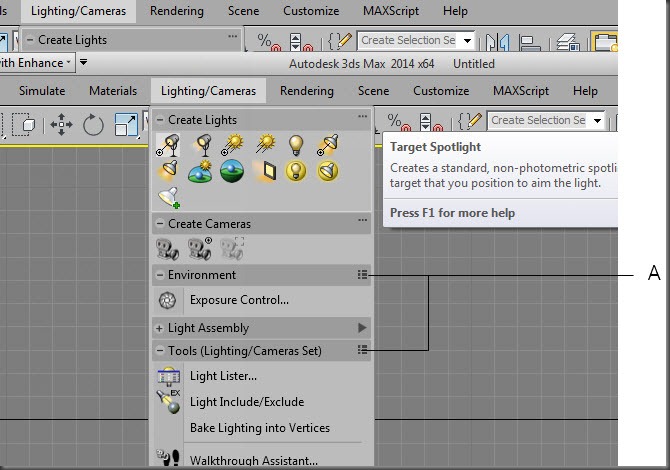
Figure6
tp4-3  The advanced Lighting/Cameras menu system
The list of function of advanced menu system is given next:

1] You can view the top level menus such as Objects, Edit, Modifiers, and so on as text, text and icons, or icons. To do so, right-click on the menu bar; a shortcut menu will be displayed. Next, choose the desired option from the shortcut menu. Figure tp4-4 shows the menu bar as text and icons.

fig7
tp4-4  The menu bar displayed as text and icons
2] Each menu is divided into different panels. You can expand a collapsed panel by clicking on the + icon on the panel’s title bar. Similarly, you can collapse an expanded panel by clicking on – icon on the panel’s title bar.

3] When a panel is collapsed, you can open contents of the panel as subpanel by hovering the cursor on the title bar of the panel.

4] You can view the contents of a panel as text, text and icons, or icons. To cycle through the three option, repeatedly click on the icon located at the right of the title bar of the panel (marked as A) in Figure tp4-4.

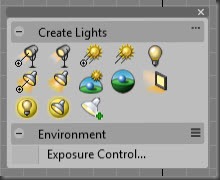
5] To float a panel, drag its title bar away. Figure tp4-5 shows the floating Create Lights panel of the Lighting/Cameras menu.
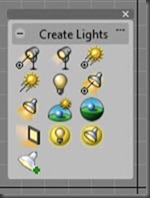
fig8
tp4-5  The Create Lights panel
6] To dock a floating with another, drag a panel over another line; a blue line will appear, refer to Figure tp4-6. Next, release the mouse button to dock the two panels, refer to Figure t4-7.
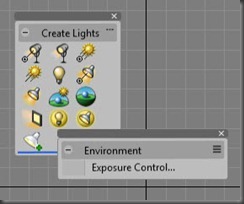
fig9
tp4-6  The blue line displayed
fig10
tp4-7  The two docked panels
7] On briefly placing the cursor on an item in the panel, a tool tip with the brief description of the command will be displayed, refer to Figure tp4-4. While a tooltip is visible, you can press F1 to open the help topic in the documentation corresponding to that command.

cgetip003-Cycling the active viewport in 3ds Max 2014

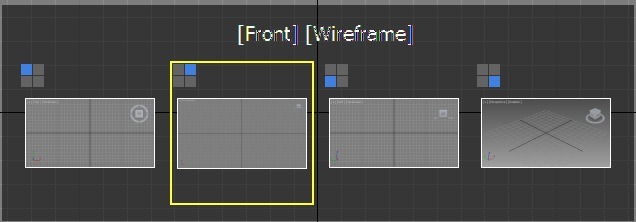
In 3ds Max 2014, you can cycle through the viewports to make the required viewport active with help of the WINDOWS key on your keyboard. When all viewports are visible, press and hold the WINDOWS key and then press SHIFT repeatedly to change the viewport focus (yellow border around viewport). Release the keys to make the viewport active. When one viewport is maximized, on pressing the WINDOWS and SHIFT keys, a window is displayed with the available viewports. Move the focus to the required viewport and then release the keys to make that viewport active, refer to Figure tp3-1.

Figure4
tp3-1  The available viewports displayed

Friday, April 26, 2013

cgetip002-How to search commands in 3ds Max 2014

Now, you can search commands/actions in 3ds Max 2014 with ease. For example, to open Light Lister window, choose Help > Search 3ds Max Commands from the menu bar or press X; a popup menu with the search field will be displayed, refer to Figure tp2-1.

Figure - 2
tp2-1  The search field
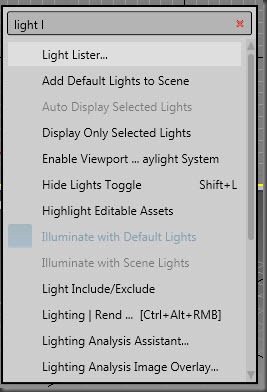
Type the string light l in the field; as you type the command the pop up menu will display the commands/actions that contains the specified string, refer to Figure tp2-2.

Figure - 3
tp2-2  The list of commands displayed
Now, choose Light Lister from the pop up menu to display the Light Lister window.

cgetip001–Autosave a file in 3ds Max 2014

Autodesk 3ds Max creates a backup of the scene and saves changes periodically. In case of system failure, you can open the auto backup scene file and continue working on it. If you have not created the project folder, on Windows 7, the default path to save the auto backup file is as follows: C:\users\<username>\my documents\3dsmax\autoback. However, if you have created the project folder, the backup file will be saved in the autoback subfolder of the project folder.

When 3ds Max is auto saving a file, the information, “Autosave in progress... (Press ESC to cancel)” will be displayed in the prompt line at the bottom of the interface. It’s a new feature in 3ds Max 2014 If the size of the file is too large and it is taking time to save, you can press ESC key to interrupt the saving process. You can also set the number of autoback files, their names, and backup time interval. To do so, choose Customize > Preferences from the menu bar; the Preferences Settings dialog box will be displayed. Next, choose the Files tab and then set the options as required in the Auto Backup area of dialog box.

Note:
1. When you start 3ds Max, the last project that you have worked with will be active and an empty scene is created with the name Untitled.
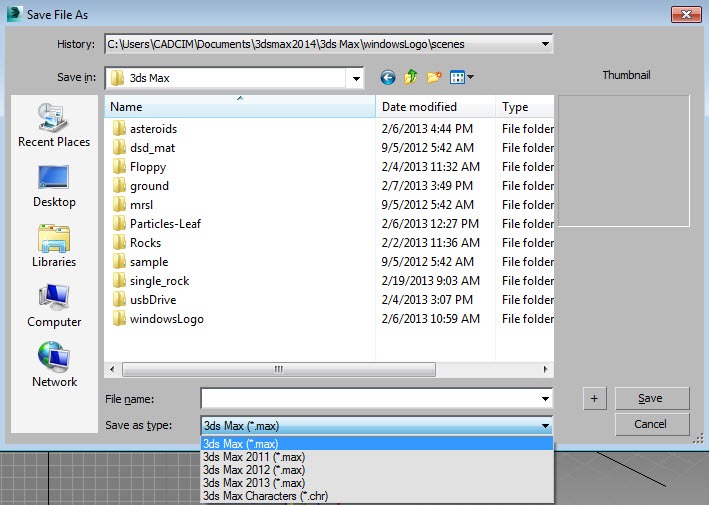
2. You can also save a scene in the previous versions (2011 and 2012) of 3ds Max. To do so, select the desired option from the Save as type drop-down list in the Save File As dialog box, refer to Figure tp1-1.
Figure - 1
tp1-1  The Save File As dialog box